
Learn dot painting with our beginner-friendly guide! Discover essential tools, techniques, and inspiration to create mesmerizing dot art today.
Discover Dot Painting: A Beginner’s Guide to This Stunning Art Form
Dot painting is captivating artists and DIY enthusiasts all over the world—and for good reason. This art style transforms even the simplest designs into mesmerizing patterns using carefully placed dots of paint. Beginners love it for its accessibility, and seasoned artists value its endless creative possibilities. Whether you’re looking for a fun DIY hobby or a new creative challenge, dot painting is worth exploring.
This guide will walk you through everything you need to know to get started, from tools and techniques to project ideas for all skill levels. We’ll even share advanced tips to help you refine your craft. By the end, you’ll have all the confidence you need to create stunning dot art pieces.
What is Dot Painting and Why is It Gaining Popularity?
At its core, dot painting involves applying small, distinct dots of color to a surface to form a design or pattern. These dots are often arranged in intricate, symmetrical patterns, creating a striking visual effect.
A Short History of Dot Painting
While dot painting is often associated with modern DIY crafts, its roots run deep. Indigenous Australian artists have used similar techniques for centuries to tell stories and represent their sacred connection to the land. Nowadays, the art form has evolved and gained global recognition for its therapeutic and meditative qualities.
Why Beginner Artists Love It
Dot painting is incredibly beginner-friendly. It doesn’t require advanced drawing skills, expensive tools, or years of experience. With just a few basic supplies and a steady hand, anyone can create beautiful artwork that looks polished and professional. Plus, the methodical repetition of painting dots makes it a relaxing escape from everyday stress.
Essential Supplies for Dot Painting
Before you start, you’ll need to gather a few basic tools and materials. Don’t worry—getting started with dot painting is surprisingly affordable.
1. Paint
Acrylic paint is the go-to choice for dot painting. It’s thick enough to hold its shape (important for making precise dots) and comes in a wide range of colors. You can experiment with metallics, neon tones, and even glow-in-the-dark paints!
2. Tools for Dotting
While there are specialized dotting tools available, many household items work just as well. Here are a few options to consider:
- Nail dotting tools
- Q-tips
- Toothpicks
- Chopsticks
- Pencil eraser tops
- Paintbrush tips
Investing in a professional dotting set can help you achieve more consistent results, especially as you start working on more intricate designs.
3. Canvas or Surface
Dot painting is versatile, and you can paint on almost any surface! Here are some popular options:
- Canvas
- Rocks or stones
- Wood slices
- Ceramic bowls or mugs (use enamel paint for ceramics)
4. Extras
Other useful tools include:
- A palette for mixing paint
- A damp cloth or baby wipes for cleaning tools
- Varnish or sealant to protect your finished artwork
Basic Techniques and Patterns to Try
It’s time to start painting! Follow these step-by-step instructions to create your first dot art piece.
1. Prepare Your Workspace
Find a clean, flat surface to work on. Lay down paper or a craft mat to protect it from spills. Arrange your paints and tools within easy reach.
2. Practice Making Dots
Before you jump into a design, spend some time practicing your dots on a piece of scrap paper. Focus on controlling the size and placement. Here’s how to vary your dots:
- Use tools of different sizes.
- Adjust the amount of paint on your tool.
- Vary your pressure—lighter pressure creates smaller dots.
3. Plan Your Design
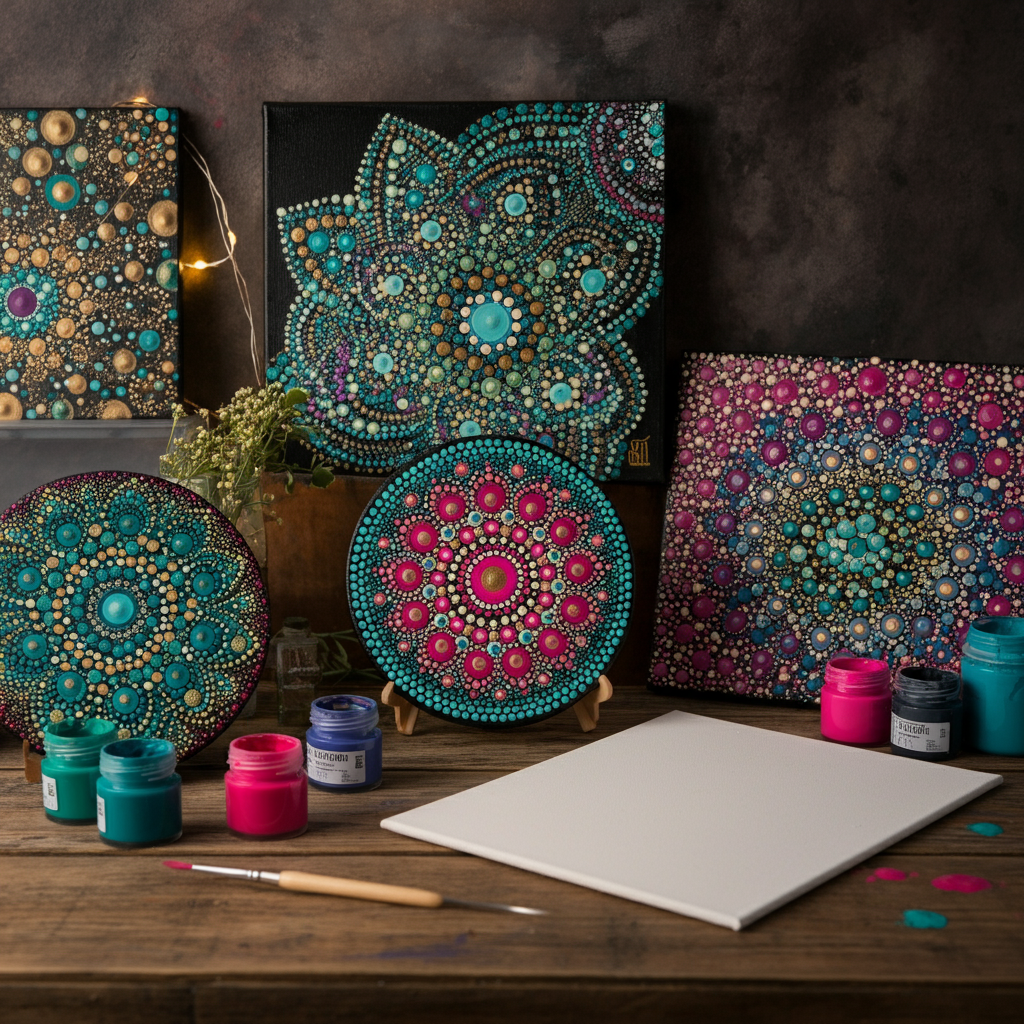
For beginners, starting with a simple mandala pattern is ideal. Mandalas are circular designs with repetitive patterns, which are perfect for practicing symmetry and consistency.
4. Create Your Art
- Begin by marking a light central guide on your surface to help maintain symmetry.
- Dip your dotting tool into the paint and place the dot firmly on the surface. Repeat.
- Gradually build outward from the center, alternating colors and sizes to add depth to your design.
5. Clean and Protect
Once your artwork is complete, allow it to dry fully and seal it with a clear varnish for protection and durability.
Advanced Tips and Tricks to Elevate Your Dot Art
Once you’ve mastered basic techniques, you can start experimenting with more advanced designs and methods. Here’s how to take your skills to the next level:
1. Experiment with Shading
Blend colors before applying them to create gradient effects within your dots. This adds a sense of dimension to your patterns.
2. Try Layering
To make your design pop, layer smaller dots on top of larger ones. Just make sure the base dot is dry before adding another layer.
3. Incorporate Unique Surfaces
Branch out from canvas and stones. Try dot painting on glass jars, fabric, or even plant pots.
4. Fine-Tune Symmetry
Use stencils or rulers to ensure your designs are perfectly symmetrical. This can be especially helpful for creating complex patterns like mandalas.
Inspiration and Ideas
Now that you’ve learned the basics and advanced tips, here are a few project ideas to inspire your creativity:
- Decorated Stones – Use colorful geometric patterns to create paperweights or garden decorations.
- Mandala Wall Art – Brighten up your living space with a bold, symmetrical mandala on canvas.
- Personalized Mugs – Craft custom, dishwasher-safe mugs for yourself or as gifts.
- Holiday Ornaments – Create ornaments with festive patterns for the holiday season.
Check Instagram and Pinterest for endless visual inspiration from other artists!
Dot Painting for Different Skill Levels
Everyone begins somewhere—and dot painting grows with you as your skills improve. Here are some project ideas tailored to your experience level:
For Beginners:
- Simple rock painting with basic polka dots.
- Monochrome dot designs using one color.
For Intermediate Artists:
- Mandala patterns on canvas.
- Layered patterns incorporating gradients.
For Advanced Artists:
- Large-scale wall art or murals.
- Complex designs incorporating two or more techniques (e.g., layering and shading).
Unleash Your Creativity with Dot Painting
Dot painting is proof that even small, deliberate actions can create something magnificent. Whether you’re a complete beginner or an artist looking to expand your repertoire, this art form offers endless possibilities for exploration and self-expression.
Why not pick up a dotting tool, gather your paints, and give it a go today? It could be your next favorite creative outlet.
Happy dotting!
Meta data
Meta title
A Beginner’s Guide to Dot Painting : Supplies, Techniques, and Inspiration
Meta description
Discover the basics of dot painting, including essential supplies, beginner-friendly techniques, advanced tips to elevate your art, and project ideas for all skill levels. Unleash your creativity with this versatile and affordable art form.
Keywords
dot painting, supplies, techniques, inspiration, beginner-friendly, advanced tips, project ideas for all skill levels.
document end without any termination phrase.
Additional Resources
Here are some additional resources to help you on your dot painting journey:
- Online tutorials and classes (many are free!)
- Books or ebooks on dot painting techniques and designs
- Local workshops or classes in your area